February 22, 2024
Ballot Proofing: Ensuring Accuracy in Elections
Download the guide:
Table of Contents
Jump to:
- Key Principles and Advice
- Understanding the Guide
- Who Should Be Involved?
- Proofing Procedure
- Security
- Communications
- Appendices
Key Principles and Advice
- Use strong recordkeeping practices, including paper and electronic filing systems.
- Rely on primary source documents.
- Communicate with all stakeholders, including candidates, other jurisdictions and vested community groups.
- Getting it right is more important than being fast.
- Be aware of deadlines and give your team enough time to thoroughly proof ballots.
- Spread the risk. Have multiple ballot proofers that can look with fresh eyes.
- Manage version control. Correct multiple errors at once before producing new proofs. This keeps versions to a minimum and reduces the number of times something needs to be proofed.
Understanding the Guide
Election administration requires precision and accuracy. Generating accurate ballots is critical to running a successful election. A structured approach to ballot proofing will help eliminate common errors that, if left unnoticed, can have a detrimental effect on your election.
Mistakes can have significant costs, such as a recent ballot error that was corrected by reprinting and spending $200,000 on overnight shipping. The headlines in 2022 and 2023 showed numerous instances of ballot printing, design and fulfillment errors, including missing contests or candidates and poor compliance with minority language requirements, all resulting in additional costs for the jurisdictions. Beyond the costs, avoidable ballot mistakes can shake voter confidence and damage election officials’ reputations. Ballot proofing, the process of ensuring accurate ballots, deserves a high degree of attention.
The purpose of this guide is to help your jurisdiction take a systematic approach to ballot proofing to limit ballot mistakes. This guide focuses on proofing inputs (the contests and ballot language) and outputs (ballot appearance and function).
While closely related, this guide does not focus on district assignments, logic and accuracy or design principles. We recommend the following resources to help with those parts of ballot creation:
This field guide created by the Center for Civic Design provides simple techniques for improving the layout and format of your ballots.

Best Practices for Geo-Enabling Elections
The National States Geographic Information Council published this guide for using geographic information systems to help ensure that voters are correctly placed within their voting districts and given the correct ballot.

Systems Check: A Guide to Testing Election Technology
Published by The Elections Group, this guide describes the process of testing voting equipment and tabulation equipment and provides checklists and best practices.
Who Should Be Involved?
In this guide, we stress the importance of including all parties in the ballot proofing process. Ballot creation and proofing involve checking your staff’s ballot creation work against the original candidate and jurisdiction filings. Deadlines for ballot printing and generating on-screen ballots are tight. Your success requires developing a plan, ensuring adequate staffing for ballot proofing and involving all interested parties in the final approval of the ballots.
| Who | Role |
| Staff |
|
| Other County/City Staff |
|
| Vendors |
|
| Language Experts |
|
| Districts (cities, towns, schools, parks, taxing districts, etc.) |
|
| Candidates |
|
| Political Parties |
|
| State Election Authority |
|
Ballot Proofing Ground Rules
The following sections provide instruction for the mechanics of ballot proofing. It is essential to fully explain the ground rules so all proofers follow the same process.
- Prepare for the ballot proofing process well in advance by contacting proofing partners to provide a timeline with tentative deadlines.
- Inform proofers that the proofing process may involve multiple rounds. This is probably most important for your internal staff and any partners within your county or city.
- Provide all proofers with instructions for the aspect(s) (e.g., voting instructions, compliance with statutes and regulations, contests, candidate names, layout, translation, etc.) they will be proofing.
- If applicable, send stakeholders a copy of any source documents they need to proof against.
- Provide proofers with clear instructions for reporting errors.
- Do not allow proofers to flag ballot errors by phone. Always require written notice. Consider having proofers use a form (e.g., Google Forms) tied to a spreadsheet (e.g., Google Sheets) to track their responsibilities and edits.
- Provide a clear deadline for stakeholders (districts, candidates, political parties) to communicate any errors. If that deadline passes and the stakeholder has not responded, your office can move forward with the next phase of ballot preparation. Create a checklist to track the deadlines and receipt of responses from all stakeholders. This documentation can be a useful paper trail in the event there are disputes later.
See Appendix 4 for and example ballot proofing instruction letter.
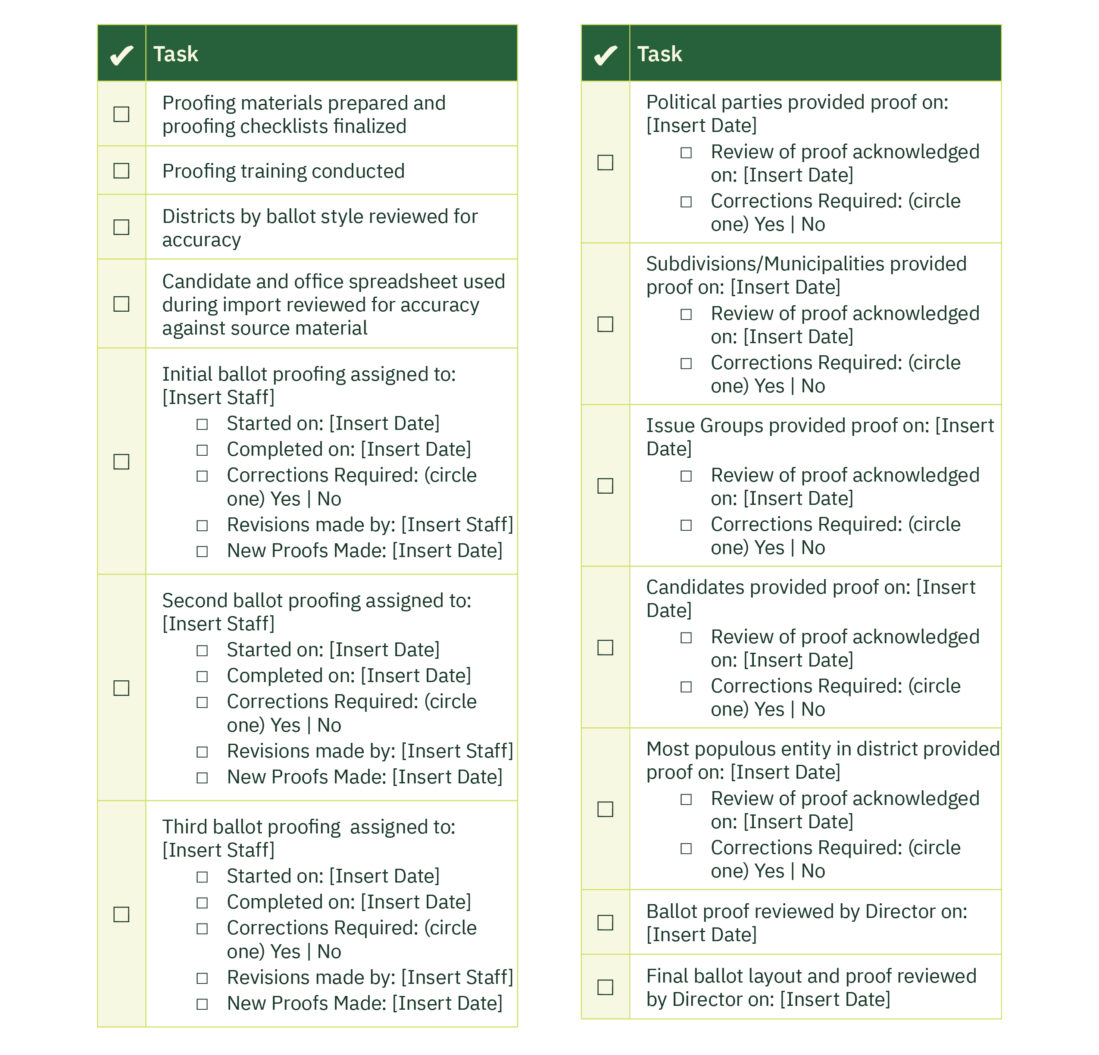
Track Progress
Because a thorough proofing process requires multiple levels of review by multiple people, it is a best practice to have a master checklist for tracking progress throughout the entire process. See Appendix 5 for an example.
Without a system in place to organize the proofing process, a team can lose track of what work has been done and what remains to be done. Tracking the progress of ballot proofing is as simple as logging the results at a summary level. With this information, a team can avoid extra work and the unnecessary rechecking of everything because they will have a record of what has been done. A tracking system shows progress to help determine if the pace of work is adequate to meet printing deadlines.
It is also vital to exercise version control. During the proofing process, you may print multiple copies of the ballot faces to mark them up. To keep track of the current version and avoid duplicating efforts or losing track of complete tasks, date stamp versions or use different colored paper at different stages.
Correcting Errors Discovered During Proofing
Plan for error corrections. The purpose of proofing is to identify errors and correct them, so you will need to establish a method for tracking and re-verifying ballots. One method is anticipating the need for corrections and including that step in the proofing checklists.
It is usually most efficient to complete a full round of proofreading for a particular phase of the process before making any corrections in the election management system (EMS). For example, if you are checking that all ballot styles include the correct contests based on the precinct and district boundaries, consider doing at least one complete review of all ballot styles to check for correct contests before programming any changes in the EMS. Likewise, it makes sense to wait for the deadline for candidates to complete their review of the ballot faces PDFs before making any changes they submit. Making multiple corrections during particular phases reduces the number of times you need to print copies of the ballot PDF and helps with version control. Note: When you change one thing in the ballot programming, it may inadvertently change something else.
It is vital to keep track of which errors have been corrected. One method is to initial and date the printout where the error was flagged as soon as you correct it. Then, ask a second reviewer to go through the pages of with errors and confirm that all corrections were made. The second reviewer should also initial and date each flag. This improves your paper trail and makes it unlikely that an uncorrected error will slip through the cracks.
It is also a good idea to send a corrected PDF to stakeholders who flagged errors during the proofing process and use the master checklist to record this step.
Proofing Procedure
The intricacies of ballot development may differ from jurisdiction to jurisdiction, but the following phases are generally involved.
 |
Pre-election preparation: This phase involves reviewing ballots from comparable elections and communicating with all districts to get an understanding of what contests will be on the ballots. |
 |
Collecting candidate and contest information: During this time, the elections office and all filing offices share their candidate lists and ballot measure text. |
 |
Compiling master ballot data: In this phase, staff checks all ballot data against the original sources to ensure accuracy. |
 |
Proofing physical ballot layout: This phase of proofing involves looking at PDFs of every ballot face and checking that all content is accurate. |
 |
Proofing audio ballots: During this phase, staff review all audio files for accuracy. |
 |
Proofing printer files: This proofing phase requires review of the ballot faces to ensure that no errors were made in production. |
Standardization of the process, meticulous recordkeeping and diligent follow-up will help ensure your jurisdiction does not miss items that should appear on the ballot and that all information on the ballot matches primary sources.
In the sections that follow, we include checklists for each phase of the typical proofing process that you can modify as needed. Each one has a column where the person responsible for that step can indicate completion with their initials or signature.
Keep all ballot proofing checklists in a single, easy to access place. Completed checklists and logs document that proofing was conducted and completed. Errors will get through, even in well-managed processes. This documentation will help show that mistakes were not intentional or due to negligence but the result of human error in performing an otherwise thoughtful and documented process.
One method of keeping track of external ballot reviewers and stakeholders is to create a Google or Airtable form that proofers complete to signal they’ve finished their proofing tasks. Submissions would be listed in a spreadsheet or table that you and other election staff can use to track progress. You could include check boxes for each task, enable attachments for the submission of scanned copies highlighting flagged issues, and incorporate fields for the date and the reviewer’s signature to indicate they have completed their portion of the proofing process. See Appendix 6 for an example.
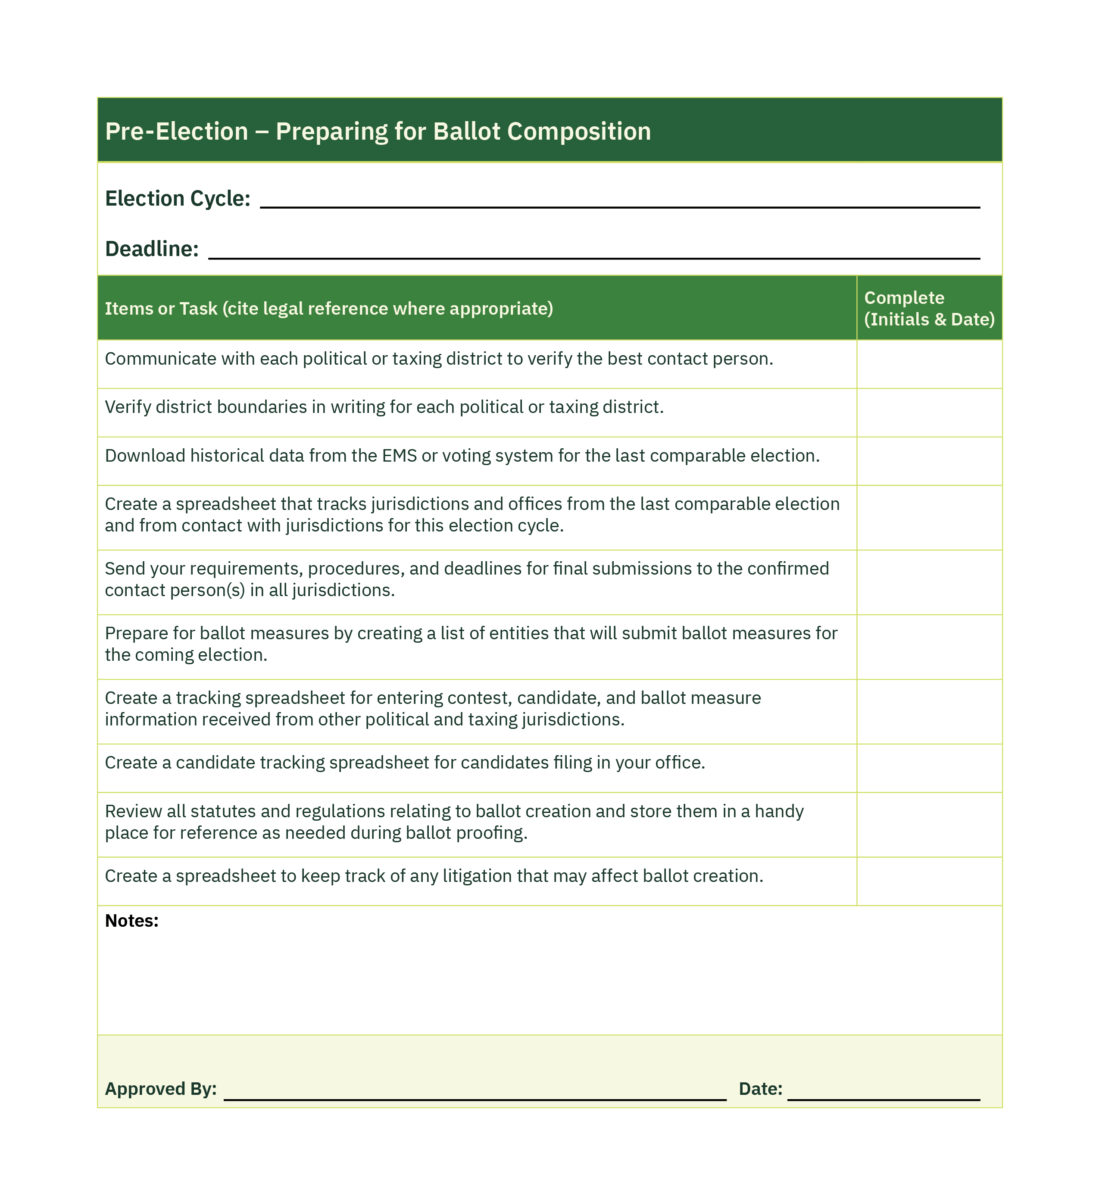
Pre-Election: Preparing for Ballot Composition
During this phase, the goal is to get an accurate picture of what should be on each ballot. This means accounting for any legal changes or district boundary changes as well as anticipating which contests will be on the ballot and which jurisdictions will have ballot measures.
Staffing for this phase depends on the complexity of your elections and whether your records are well organized and up to date. Understanding what contests to expect on a ballot starts with a comparison to past elections. For example, the general election ballot for an upcoming presidential year will look pretty similar to the general election ballot for the last presidential year. Likewise, primary election ballots are comparable from presidential cycle to presidential cycle and from nonpresidential cycle to nonpresidential cycle. Most offices have a two-year, four-year, or six-year term. You may be able to download lists of contests and candidates from your EMS or voting software for the last several elections to get started.
Maintaining a spreadsheet that shows each district’s candidate types, when they were last on the ballot and the term of office can help you anticipate when offices will be on the ballot again. Here is an example:
| Office Title | Term of Office | Last Elected | Next Election |
| U.S. President | 4 years | 2020 | 2024 |
| U.S. Senator | 6 years | 2022 | 2028 |
| U.S. Senator | 6 years | 2018 | 2024 |
| U.S. Representative Congressional District 1 |
2 years | 2022 | 2024 |
| Governor | 4 years | 2022 | 2026 |
| County Commissioner District 1 |
4 years | 2020 | 2024 |
Local school board, municipal council and special district elections can be more complicated. Within the same district, some seats may have four-year terms while others have two-year terms. Some seats are at-large and some are by district. For accuracy and planning purposes, consider reaching out to your local authorities to validate their election contests for the year ahead.
If you wanted to create a multipurpose spreadsheet, you could add columns for the filing officer, contact information, and date of last update. Preparing a spreadsheet like this for the first time isn’t quick, but it will be easy to update and help ensure your office regularly contacts every jurisdiction and updates the contests that should be on the ballot and when. If your jurisdiction is required to note incumbency for officials running for reelection, you could also track that information in this spreadsheet.
Before any election, review the laws and regulations for ballots in your jurisdiction. Some statutes or administrative codes dictate the order of contests, candidate rotation, font size, headings, instructional text, captions and other aspects of a ballot. Check to see if your legislature or state election authority made any changes following your last election.
For primaries, check for any rule changes regarding political party recognition and participation in the primary process. Political parties can change whether they have open or closed primaries, and this will impact ballot creation and proofing.
Another area to monitor is the courts. Ballot creation issues can be part of litigation. For example many jurisdictions have candidate challenges or litigation involving ballot measures. Stay informed about legal challenges with an eye toward ballot printing and mailing deadlines.
Collecting Candidate and Ballot Measure Information
Gathering the information that must appear on the ballots for each election involves working with various stakeholders. The state election authority will provide a certified list of candidates for the federal, statewide and legislative offices and certified text for any statewide ballot measures. Political and taxing districts will also provide certified lists of candidates and text for ballot measures. And your office is likely a filing officer for various candidate contests and ballot measures. Keeping all of this information organized is paramount. (See Appendix 7 for a chart that shows the sources of ballot data and how best to proof them.)
When preparing summary documents, such as lists of candidates, mistakes are possible. A best practice is to provide or request copies of filing documents along with the certified information. All stakeholders should feel empowered to ask questions if something looks off. A look at news headlines over the past few years illustrates that errors can be caught early if all stakeholders take an active role in reviewing ballot data when it is collected and transmitted to the county or city elections office responsible for preparing the ballots.
Pay close attention to:
- The number of open seats for each contest, especially when voters may vote for more than one candidate
- Contests for unexpired terms
- Incumbents, if noting incumbency is required by law
- Cross-county contests
- Political party indicators
- Statutorily required language or formatting for ballot measures
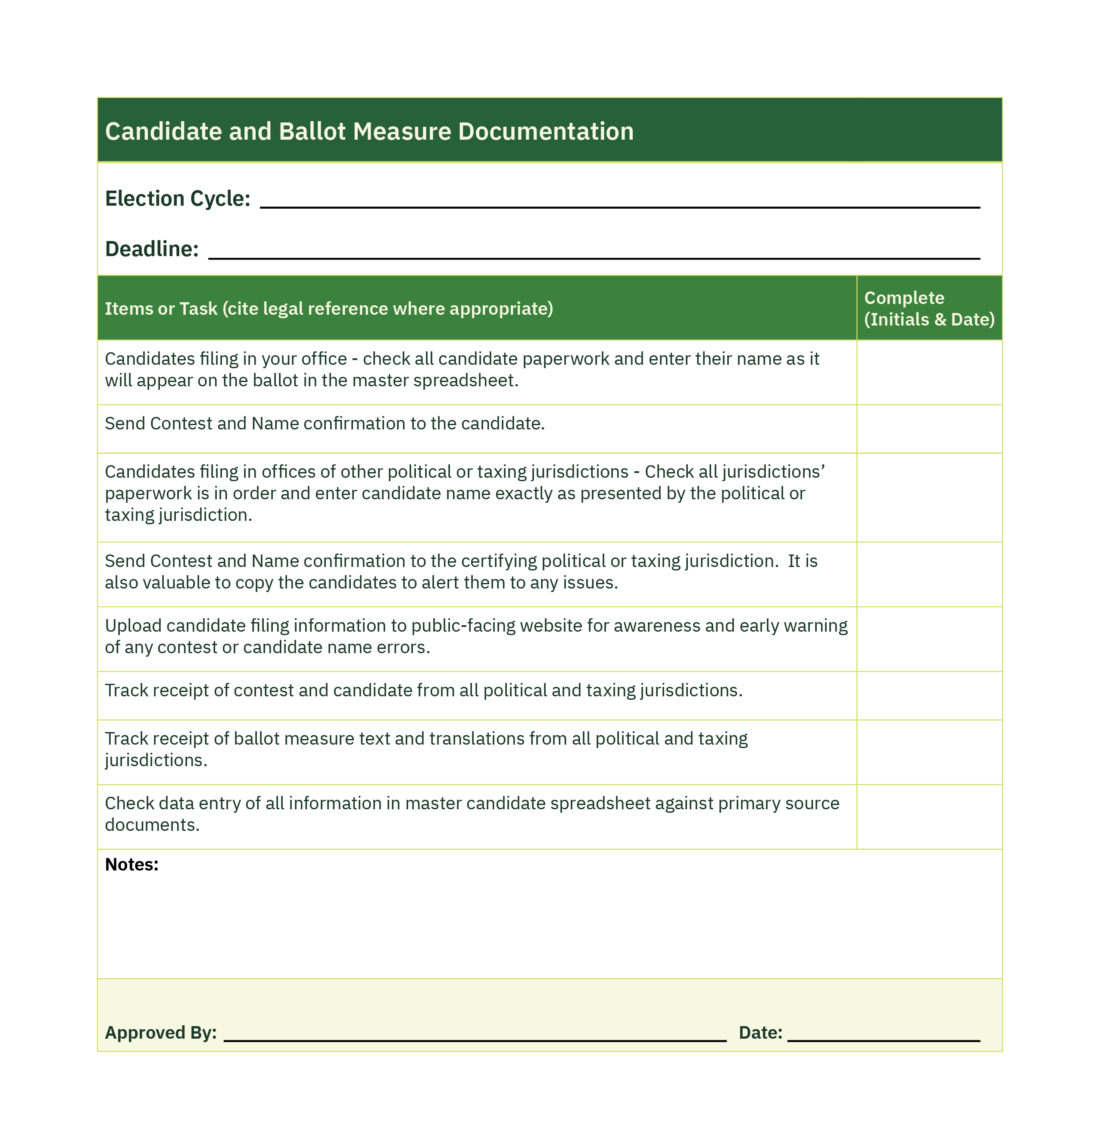
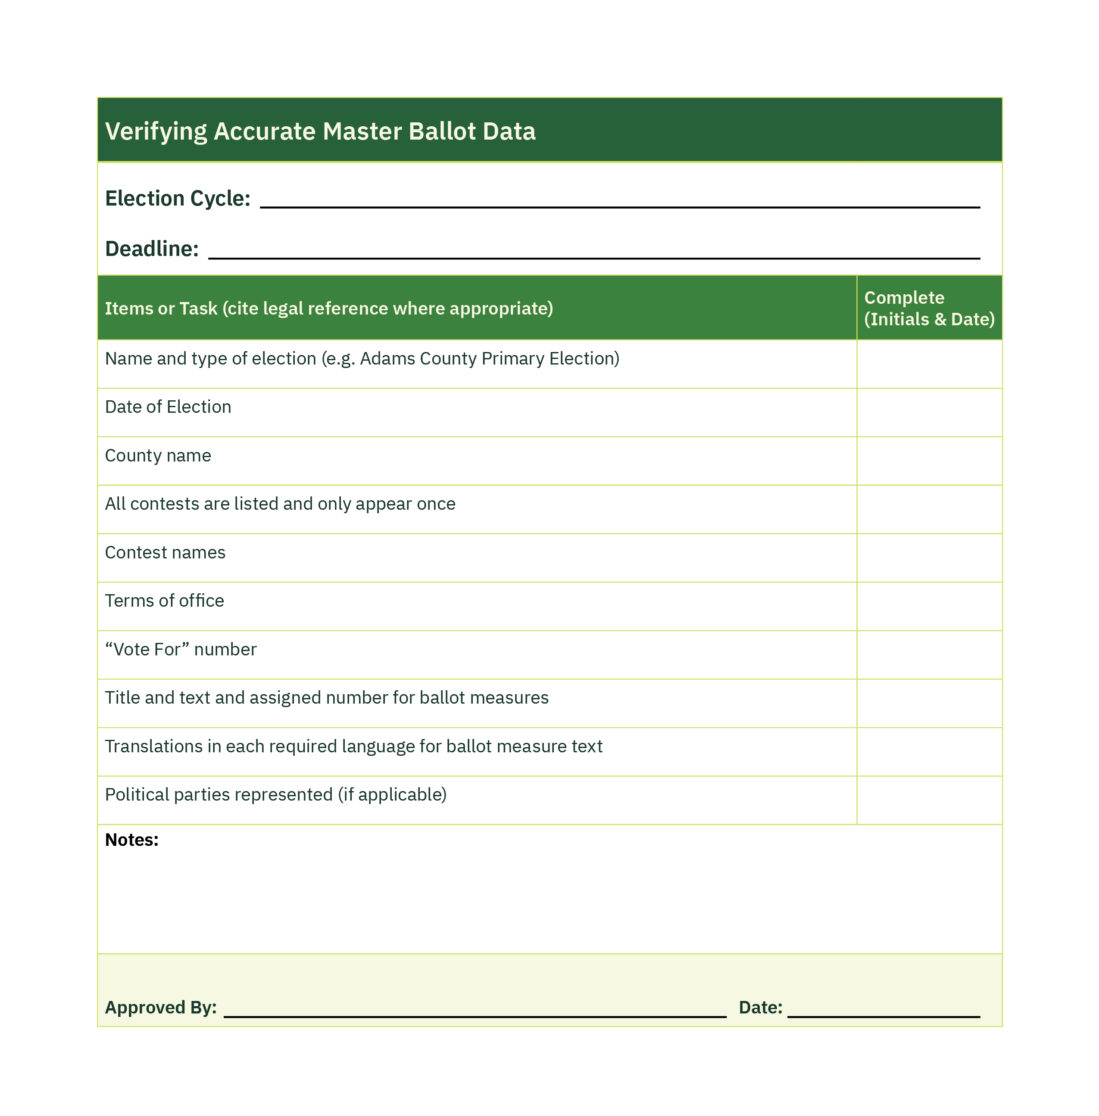
Compiling and Verifying Master Ballot Data
After receiving all ballot data from all filing offices, the next step is to verify that staff has accurately entered all information into your master candidate spreadsheet. Some jurisdictions input contest, candidate and ballot measure information into their voter registration system and then export the information in a file that is then directly imported into the EMS.
Next, it is essential to verify all data against the source documentation. For candidates who filed in your office, check the data entry against the documentation each candidate submitted. This may include a candidate nomination paper or certificate of candidacy. Be sure to use the latest information if your office allows for amendments or if a candidate submitted a change request in response to your candidate confirmation letter.
For candidates who filed with other political and taxing jurisdictions, your primary source documentation may be the certified list of candidates that the district sent. If the districts sent the candidate filing paperwork, check that documentation as well. If there are any discrepancies, contact the political or taxing jurisdiction immediately to seek clarification in writing.
For ballot measure text, ask for documentation in Word so the text can be copied and pasted into the EMS rather than manually typed. This is particularly useful for language translations that may have special characters.
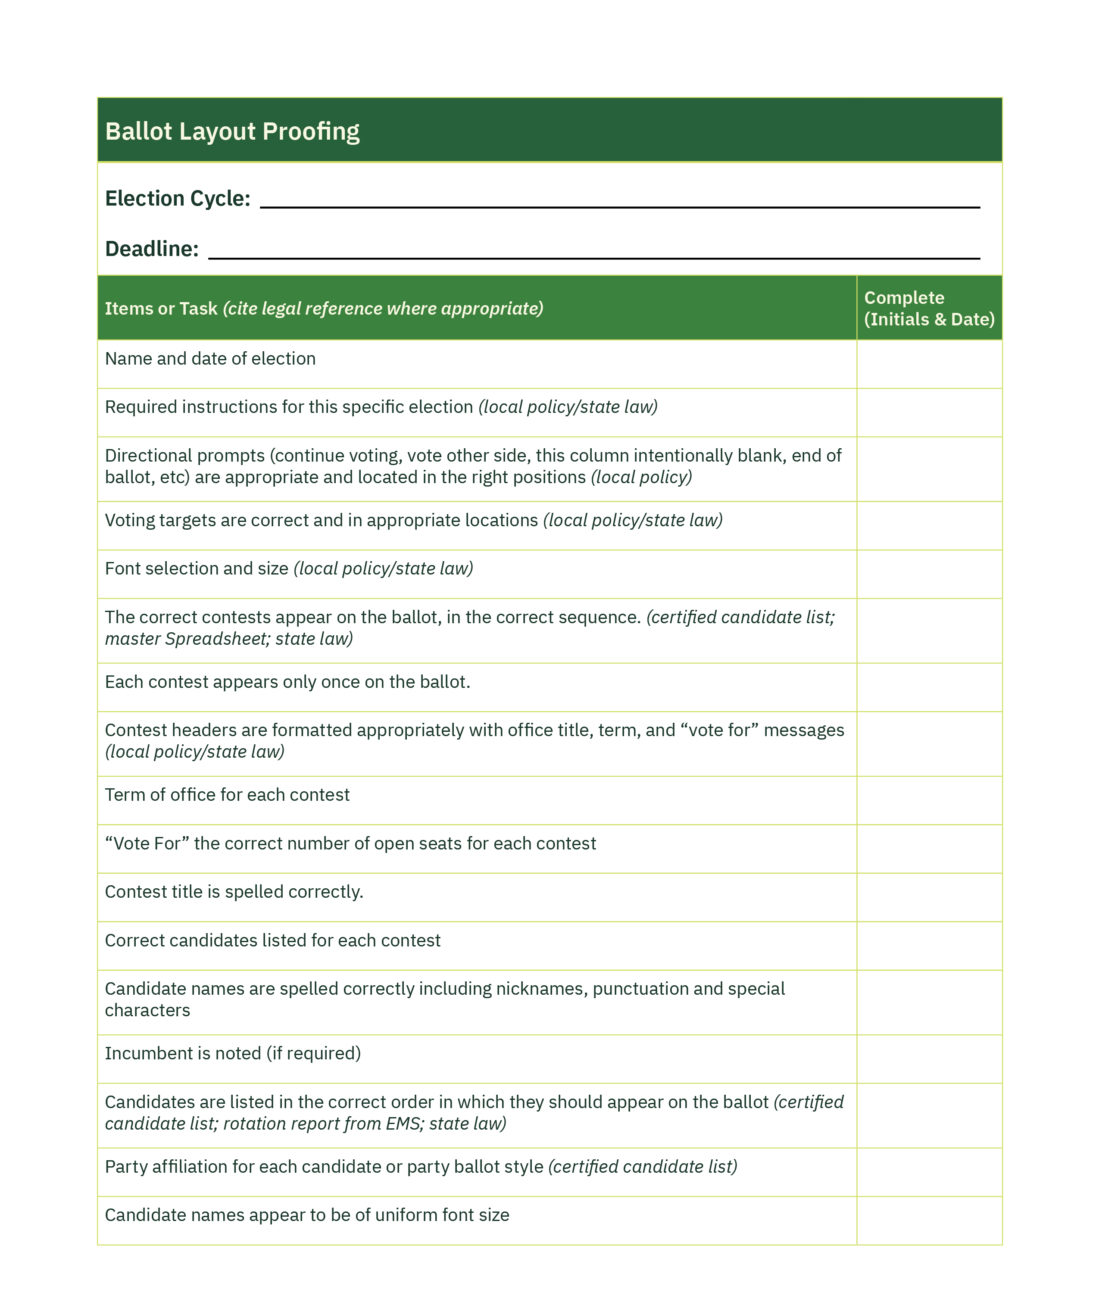
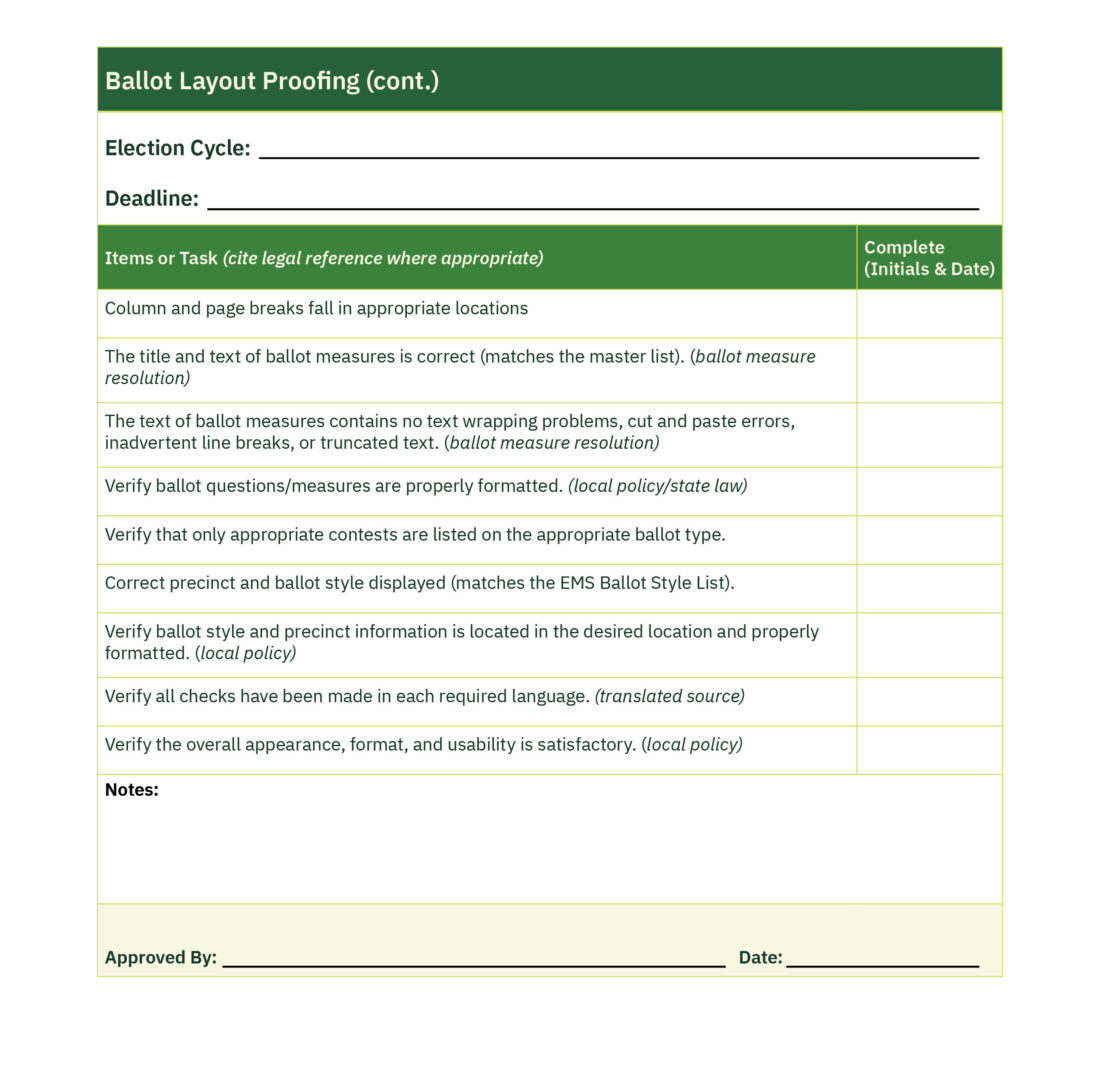
Proofing the Physical Ballot Layout
After your office has entered all the ballot data for all the contests and ballot measures, you will generate ballot faces in your jurisdiction’s EMS. This step creates the proper “ballot face” for each party (for a primary election) and precinct or precinct part with its selected contests according to the districts’ boundaries. Each ballot face should have a caption with the name and date of the election, precinct information and instructions to the voter followed by the contests in the order required by your state’s statutes and regulations. Depending on the number of precincts or precinct splits in your jurisdiction and the number of political parties participating (if you use separate ballots for a primary election), you may have hundreds of different ballot styles. You must review each one to ensure the proper contests are displayed and the ballot complies with all legal requirements.
For this level of review, proofers will be looking at images of the ballots in any of the following formats:
- PDFs
- Printouts of the PDFs
- Ballot Marking Device (BMD) screens
Before distributing ballot faces to proofers, apply a watermark indicating that these are draft ballots and/or suppress the timing marks from printing to ensure ballot security.
Internal elections staff and other department staff within your jurisdiction (e.g., county attorney, accounting staff, auditors) assisting with ballot proofing should use the comprehensive checklist below. You may wish to give other stakeholders, such as candidates and political and taxing jurisdictions, a short checklist that includes the specific information they need to review and approve:
- Contest names
- “Vote for” message
- Candidate’s name spelling
- Candidate order or rotation
- Ballot measure text
- Ballot measure layout (font, heading, yes/no language)
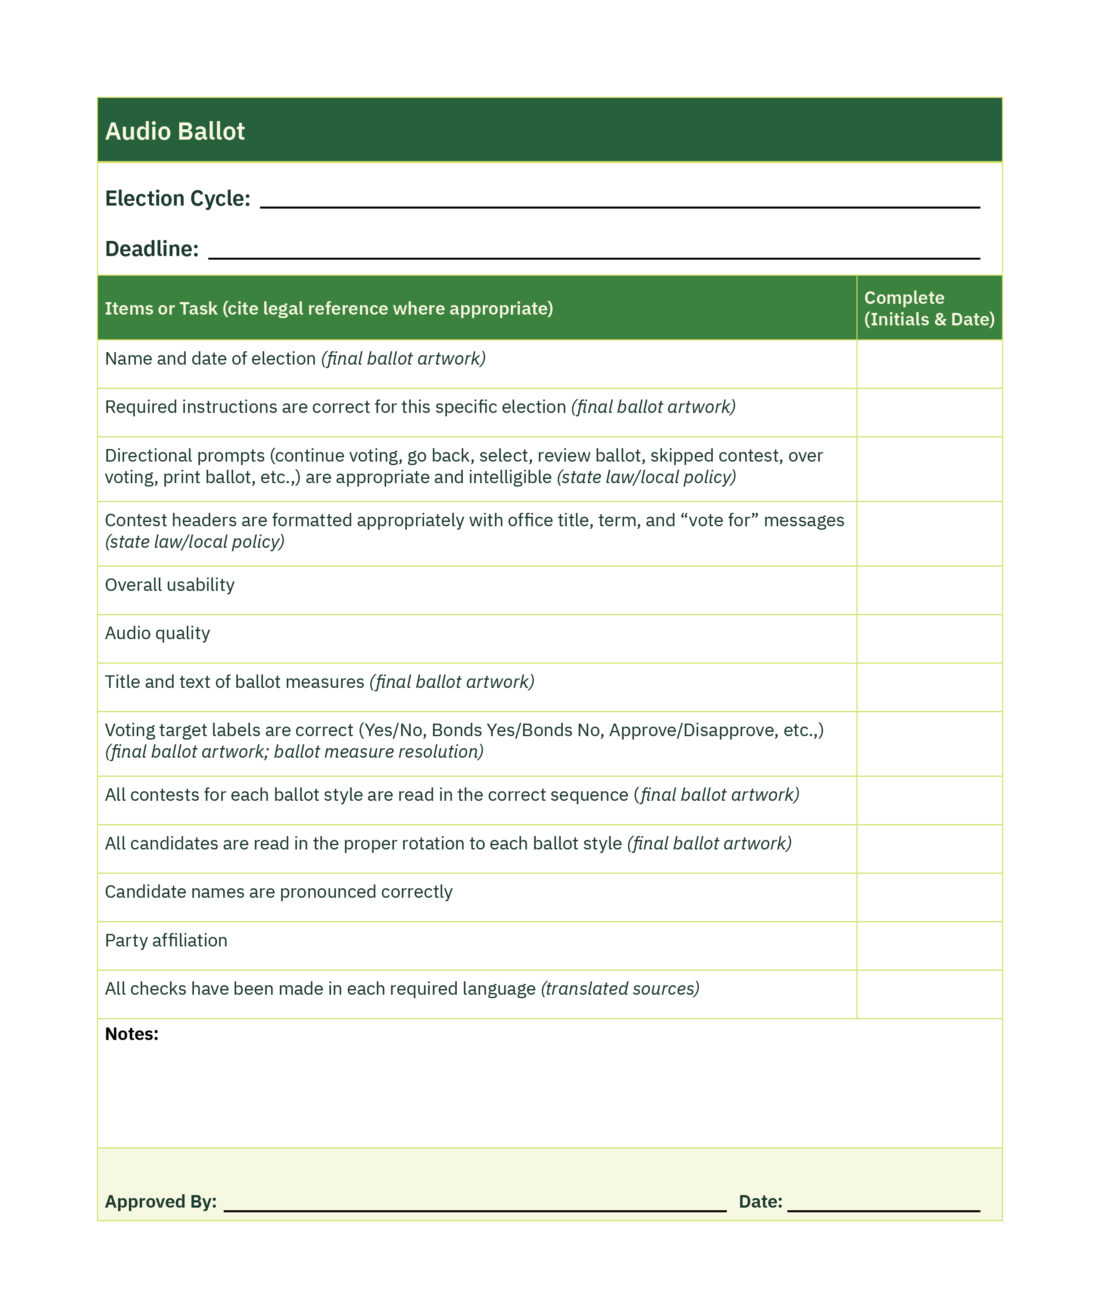
Proofing the Audio Ballot
Whether your office has ADA-compliant voting equipment or you use digital ballots on a remote voting site, you will need to prepare and proof audio versions of your ballots. Programming the audio text may involve using text to speech software and phonetic language to ensure correct pronunciation.
A best practice for proofing audio ballots is listening to the audio content while following along with the written ballot content.
Some tips for success:
- Ensure the pronunciation is correct for candidate names. If necessary, reach out to the candidate or candidate’s filing officer for a phonetic pronunciation of the name.
- Pay close attention to numbers (dates, dollar amounts, roman numerals, etc.). These are often verbalized incorrectly by the software, which tends to read them literally.
- Be sure to translate audio content into any languages required for your jurisdiction.
- Your EMS may contain “stock” audio content for instructions to the voter. Thorough proofing should include listening to these instructions to ensure that they are still accurate.
Consider inviting students from schools for the blind or those with visual impairments to assist in testing audio ballots. You may also want to invite members of cultural organizations who are fluent in other languages to test translated ballots.
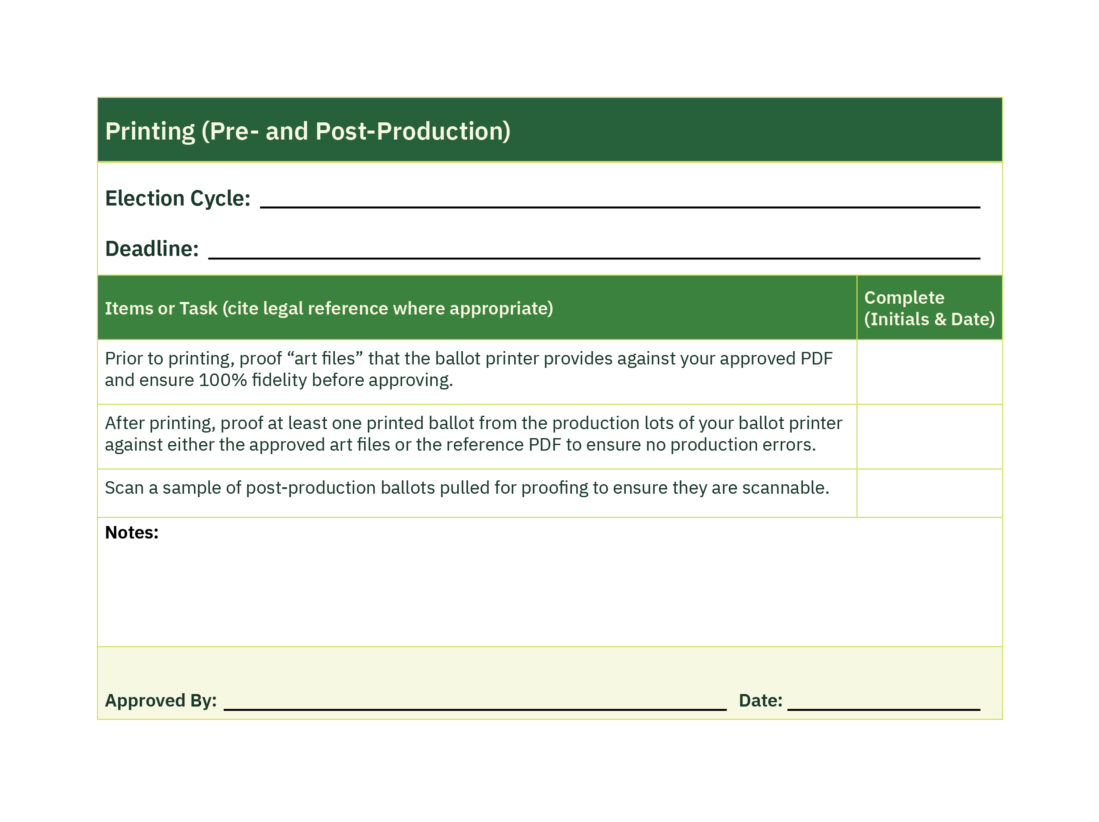
Proofing Printer Files
After completing the preceding proofing stages, you should be ready to send your ballot face PDFs to your printing vendor, if you use one. Before you do, print several ballots on a Ballot on Demand (BOD) printer, if you have access to one. This will allow you to test them on the voting and tabulation equipment you will be using for the election. If you need to make programming changes later due to equipment issues, this may affect your ballot PDFs and require you to start over with your print vendor.
The print vendor will likely add markings on your ballot faces, such as fold marks and ballot stubs. It is important to carefully review and compare every ballot face in the “art file” the printer sends with your original PDFs to ensure there are no errors. Pay careful attention to all ballot style indicator data or precinct information. If you have specific requirements for political party ballots for primary elections (e.g., some jurisdictions use a colored stripe to indicate political party) or indicators for types of ballots (e.g., TEST, EARLY, MAIL, etc.), be sure to check for those as well.
Additional Considerations
It is not the printer’s job to proof your ballot.
When a printer receives a PDF, they generally do so with the assumption that it’s good to go. If the printer needs to make any changes to the artwork file, the customer should proof it again.
Did you know?
Any change to a ballot file in the EMS will require you to regenerate all ballot files, including the ballot PDFs for printing and the digital files for your voting machines. You will need to reproof all ballots, which includes audio ballots. If this is not done, ballots may not be read — or worse, may be read incorrectly. If you make any changes after logic and accuracy (L&A) testing, you need to redo L&A.
Avoid these common mistakes.
This guide is intended to help election officials avoid these common mistakes. We’ve seen them all!
- Leaving a candidate’s name or contest off the ballot
- Inaccurate “Vote for” instructions (e.g., putting “Vote for One” when it should be “Vote for Two”)
- Misspellings
- Incorrect versions of referenda
- Incorrect order of candidates
Security
Like all aspects of election administration, stakeholders should employ strong security procedures when ballot proofing to prevent breaches and, in the event of a breach, mitigate the potential impact.
- If your jurisdiction uploads ballot data using a CSV or similar file, use best practices for USB drives or similar portable data devices. The Cybersecurity & Infrastructure Security Agency (CISA) provides guidance on using caution with these devices as well as properly disposing or wiping information from these devices.
- If your ballot is built on a voting system housed in a secured room, limit access to those who need it and require that staff enter the room in pairs.
- If your voting system is not in a secured room, take necessary steps to secure it as soon as possible.
- Do not share primary ballot files with any outside parties, aside from your printing vendor if you outsource printing operations.
- Watermark with “proof” or “sample” any ballots you share with outside stakeholders and render the ballot unreadable by removing the timing marks or barcode.
Communications
Be forthcoming about mistakes missed during the proofing process. As quickly as possible once you discover the mistake, issue a concise release to media in your area that outlines the issue and the steps you are taking to rectify it.
Example Press Release
April 16, 2030
GOTHAM CITY – About 1,200 voters will be affected by an error in the contest of City Clerk for Gotham City’s 2030 Municipal Election.
Ballots mailed to 1,234 voters on April 14 did not include all candidates for City Clerk.
All voters affected will be individually mailed a notice of the error with additional information and instructions.
Our office has instituted additional checks to prevent similar errors in the future.
For more information, contact the Gotham City Elections Office at 123-456-7890 or elections@gothamcityelections.gov.
###
Authorize a limited number of team members, generally one or two, to speak to the media about the mistake. Like the content of the press release, ensure messages to the media are concise and consistent. Briefly describe the issue and highlight the steps you are taking to fix it and ensure it does not happen again.
For more guidance on ballot error communications strategies, see our Crisis Communications resource.
Appendices
Appendix 1: Example Language for Memorandum of Understanding or Intragovernmental Agreement
This Intragovernmental Agreement (“Agreement”) is entered into by and between ABC County Clerk and Recorder (“Clerk”) and the XYZ School District (“Entity”). Agreement is made effective upon the signature of Clerk and Entity.
Clerk and Entity agree as follows:
Duties of Entity
Ballot Preparation
Prepare a list of candidates and the ballot text and title for each ballot measure.
Provide a certified copy of the ballot content (contests and measures) no later than 5:00 p.m. on the Xth day before the election.
For ballot measures, Clerk requires that each ballot measure be not more than 200 words in accordance with [State Statute]. Entity will provide translations in Spanish and Chinese, as required by Section 203.
Entity must provide certified ballot content in Microsoft Word format (.doc or .docx) as an attachment to an email to clerk@abccounty.gov.
Entity will proofread and approve ballot content for printing immediately upon receipt from Clerk. Entity must designate a person to be available for proofing and approving ballot content for printing.
Appendix 2: Template Election Preparation Letter to Districts
If your office administers elections for other districts, you can customize and use this template to communicate with them. If you keep track of current elected officials for each district or if you are required to denote incumbency on the ballot for candidates running for reelection, include that information in your letter to ensure accuracy. Consider adding a section to ask whether the district expects to have a ballot measure on the ballot, and if so, to provide a date when ballot text and translations are due. Be sure to require districts to respond in writing for accuracy and tracking purposes.
Dear [District Point of Contact]:
In preparation for the 2026 election cycle and in accordance with the Memorandum of Understanding dated May 1, 2025, the official election dates are: [insert dates and types of elections].
To assist with our preparation, please confirm or correct the following information:
Boundaries:
According to our records, the legal description for Johnson County Mosquito Board is [insert legal description], and the map file we have on record is dated [insert date].Response:
[ ] The boundary information is correct.
[ ] The boundary information needs to be updated. A copy of our updated legal description and/or map file is attached.
Candidate Contests:
The Johnson County Mosquito Board has two open seats with four-year terms and one open seat with a two-year term on the general election ballot for November 3, 2026.Response:
[ ] The candidate contest information is correct.
[ ] The candidate contest information needs to be updated. A written statement of our contests for the 2026 general election is attached.
Please check the appropriate boxes above and, if necessary, provide additional documentation for the district’s boundaries and/or candidate contests. Sign, date and return this letter by [insert date]. Thank you for your assistance with election planning.
Appendix 3: Template Confirmation Letter to Candidate
Sending a written confirmation of how each candidate’s name will be listed on the ballot allows candidates an opportunity to address any issues early in the process. Note, you may want to discuss with your jurisdictions whether you will send a letter directly to candidates who file candidate paperwork with their office.
Dear [Candidate Name],
Thank you for qualifying as a candidate for the [office of Clerk & Recorder] in the [2028 general election]. Our team looks forward to working with you as you take on the exciting challenge of running for public office.
Your name will appear on the ballot as follows:
[Candidate Name]
[Clerk & Recorder]Please ensure that this information is correct. If there is an error, please reply in writing with the correct spelling of your name or office by [insert deadline]. To ensure accuracy, our office requires a written record and will not make changes communicated solely over the phone.
If you have any questions, please contact my office at [phone number] or
[email address].Thank you for your assistance.
Appendix 4: Ballot Proofing Instruction Letter
Dear [insert name],
Thank you for your partnership as we work together to finalize the ballot for the upcoming election.
[Attached or via link] you will find the ballot proof for the upcoming election. Please inspect it carefully to ensure the information for the offices or issues you are responsible for are correct.
Whenever possible, compare the office and candidate information on the ballot proof with the source documentation (e.g., petitions, resolutions, etc.) for accuracy:
- Office title
- Term type (e.g., Full or Unexpired)
- Number of candidates to be nominated or elected (e.g., Vote for One, Vote for Two)
- Correct number of candidates
- Spelling of each candidate’s name
- Proper rotation of candidate names
- Write-in line (if it needs to be included)
- If more than one office, the order in which they appear
For [ballot issues/measures/questions], verify the following for accuracy:
- Issue title
- Text (ensure it matches the original documentation)
- Font size and type (bold, normal, italics)
- Response text (e.g., For, Against, Yes, No, etc.)
- Text wrapping from one column to another
- If more than one issue, the order in which they appear
Please contact our office by [insert deadline] noting any errors or required corrections. We will provide another proof once any corrections are made.
If you have any questions, please contact [name and phone number/email].
As a reminder, you have until [inert deadline] to respond.
We appreciate your prompt attention.
Appendix 5: Master Checklist
The purpose of the master checklist is to provide the person(s) supervising the ballot proofing with a means to verify the process was completed in full. Use the example checklist below as the basis for your own master checklist that will ensure sure no key steps are missed.
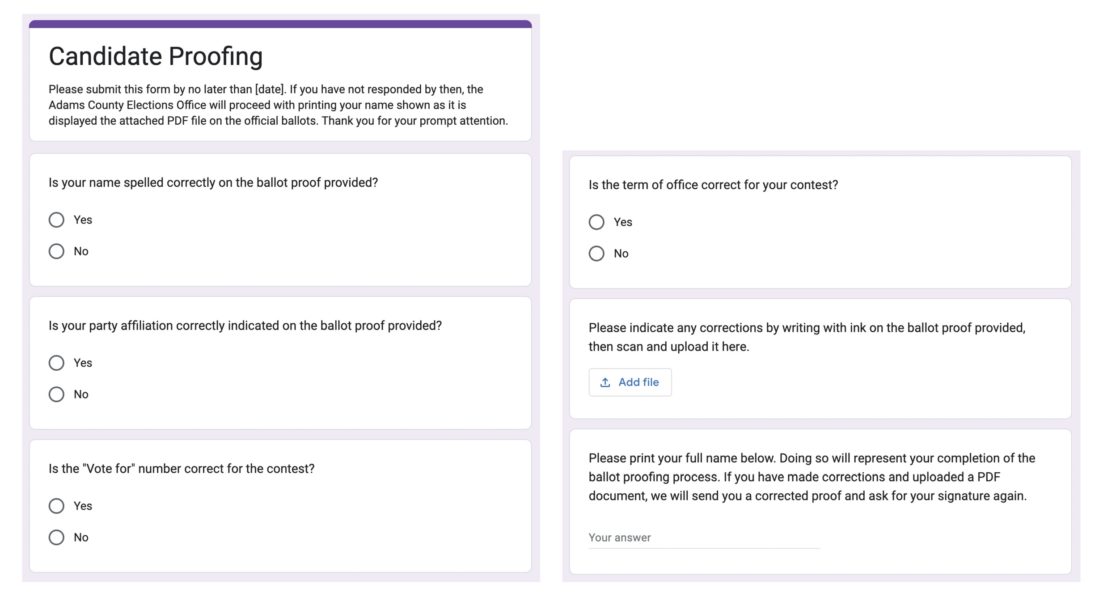
Appendix 6: Google Form for Ballot Proofers
Google forms are easy to create. You need a Gmail account to begin. Setting up specific types of questions (e.g., short answer, check all that apply) is intuitive but also supported by many how-to guides. Below is an example form to send to a candidate for ballot proofing.
Include an introductory paragraph to explain how the Google form will be used. Then add the specific questions you want the ballot proofer to answer. You can include a question using the “file upload” feature so the reviewer can submit a PDF marked up with their requested corrections. Responses accumulate in a spreadsheet that the author of the form can share with others in the election office.
You can send each candidate an email containing a link to the Google form, a PDF of the ballot proof(s), and a PDF of their candidate filing documentation.
Appendix 7: Election Data Table
| Data Source | Method of Data Transfer | Best Practices |
| State Ballot Data Scenario 1 |
Scenarios 1 and 2 are not mutually exclusive. |
|
| State Ballot Data Scenario 2 |
Scenarios 1 and 2 are not mutually exclusive. |
|
| County or Jurisdiction-Wide Ballot Data |
|
|
| Political and Taxing District Ballot Data |
|
|
Download the Ballot Proofing Guide: Ensuring Accuracy in Elections (PDF)
View our webinar: Proofing Ballots for Perfection: Tips for Mistake-Free Ballots.


