October 19, 2022
Election Management Calendar
The Election Management Calendar Guide (PDF) and Election Calendar Spreadsheet (Excel) are available for download:
Making use of this resource
A task management tool can help alleviate some of the strain election officials face managing a wide range of responsibilities in a very constricted time frame:
-
oversight of election administration and compliance tasks
-
risk management
-
communications
-
budgeting
-
organization governance
We developed this calendar-style task management spreadsheet to help election officials like you ensure all election tasks are completed—and completed on time. You can assign tasks to individuals or units, add dependencies and indicate a specific focus area for each task.
It can serve as a jump-starter for newer election officials who may be starting from scratch and without institutional memory. For others, it is a helpful reminder while juggling duties. And for election officials receiving management support from local government entities without election experience, it can help focus discussions.
Modify the spreadsheet to suit your office’s needs: add or delete tasks, change deadlines and assign duties for tracking and accountability purposes. You will find instructions to make this tool fit your management needs below. Keep in mind that the spreadsheet is designed to be a living document, so regular discussions and updates will help you make the best use of it.
Reach out to us directly for support customizing a management calendar, using it as a formal project management tool or developing a more advanced tool with the help of a vendor or nonprofit organization.
Getting Started
Keep reading or refer to this guide (PDF) for instructions, resources and tips for customizing and using the election management spreadsheet.
Jump to:
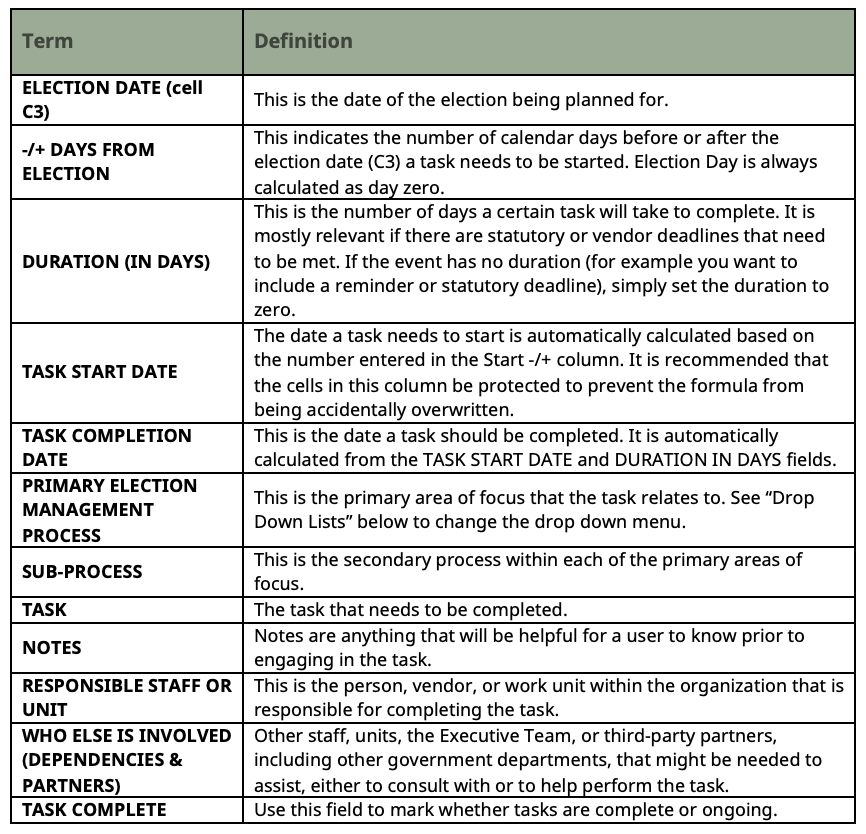
Column Definitions
Using the Spreadsheet
Filtering and Sorting
Use the Sort & Filter function to adjust the viewable cells or change the order in which they appear.
This function allows the user to change the view to display only the tasks assigned to one unit. While the election official may keep a master list of tasks, unit supervisors can be provided with an exported list that only includes the tasks for which they are responsible.
Importing into other productivity tools and applications
Web-based software services like Airtable, Asana, Monday.com, Jira, or other project management tools, are useful to organizations that require collaboration across multiple departments and processes. They provide tools to upload existing sheets to create projects in the application.
Sharing
The calendar can be easily shared as an editable Excel file, Google Sheets, or PDF.
Making Changes
Election and Election Date
For every election, update the Election (A2) and Election Date (C3) to reflect the tasks to be completed.
Task Start and Completion Dates
The start and completion dates (columns C and D) are automatically calculated using formulas. If you make a copy of an existing spreadsheet and update the Election Date field (C3), all your start and completion dates will automatically update.
If you need to create a new row, or you accidentally delete a formula, here are two ways to enter the formula correctly.
Option 1. Use the “fill” feature.
-
Highlight the row where you wish to insert an additional row.
-
From the toolbar, click Insert > Rows > Insert 1 row below.
-
Manually enter the -/+ Days and Duration.
-
Highlight cells C and D in the row above your new row.
-
Hover your cursor to the bottom right corner of the D cell until the black plus (+) sign appears.
-
Drag your cursor directly down to the same cells in your new row. The correct formulas will automatically populate.
Option 2. Manually type the formulas. For this sample, we will assume you are in row 9.
-
Go to cell C9.
-
Type this formula (without the quotes): “=$C$3+A9”
-
Go to cell D9.
-
Type this formula (without the quotes): “=C9+(B9-1)”
Create a formula in each cell of the TASK START DATE column (Column C) to subtract the Start (+/-) (Column A) from the Election Date (B3) using an absolute cell reference of the Election Date ($B$3).
Sample Formula
Cell B9: =$B$3+ A9 is the same as Cell B9: 5/17/22 – (-180)
Both return an output of 11/18/21
Drop Down Lists
Columns E, F, and L (processes, subprocesses, and completion information) all have drop down menus. Drop down menus can make data entry easier. More important, they can help keep you organized by restricting what values can be entered into a field.
For example, the Responsible Unit column restricts the input to one of seven units: Executive, Election Technology, Mail Ballot Processing, In-Person Voting Operations, Election Workers, Candidate Services, Data Services, and Voter Services.
You can customize your drop-down menus using the “data validation” feature.
Data Validation in Excel
To update a drop down menu in Excel, follow these steps. Note that the contents for your drop down list (the choices you want to appear in the drop down) are listed in a second worksheet in the same Excel file.
-
Locate the worksheet where the drop down choices are listed. Edit your list.
-
Locate the worksheet and column with the cells containing a drop down menu. Highlight the cell (or cells in the same column) you wish to update.
-
From the toolbar select Data > Data Validation.
-
In the Data Validation window, select Settings. Set the following parameters.
-
Allow: List
-
Ignore blank (checked)
-
In-cell dropdown (checked)
-
In the Source box, select the icon to the left of the box. It looks like a red arrow pointing to a blue box. This will collapse the Data Validation window. Go to the worksheet with the drop down list, and highlight the entire list. Hit Enter. The Data Validation window will enlarge again.
-
Hit OK
-
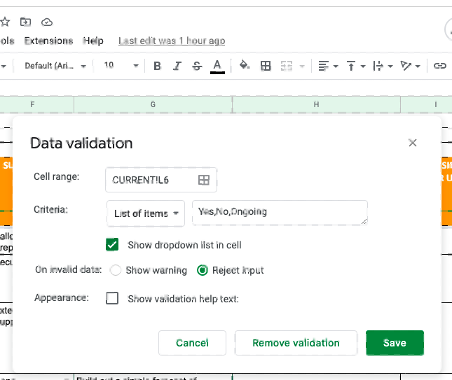
Data Validation in Google Sheets
To change a drop down menu in Sheets, follow these steps
-
Highlight the cell (or cells in the same column) you wish to update.
-
From the toolbar select Data > Data Validation.
-
In the Data Validation window, set the Criteria to “List of Items”.
-
In the field to the right, add or edit the values you would like to appear in your drop down list. Separate each item by a comma.
-
Check the box “Show dropdown list in cell”.
-
Set “On invalid data” to “Reject input”.
-
Leave the “Appearance” box unchecked.
Similar resources:

Election Audits
Private: Pre-Election Testing of Election Systems
Technology has redefined what it means to “test” before an election due to the introduction of a variety of technological components used by election officials. Before the advent of some […]
Aug 27, 2024
Communications
Schedule of Events for an Election
Providing a schedule of important events for an election is an easy way to make sure that members of the public and media are updated on what goes into administering an election.
Jul 11, 2022
Communications
Mail Ballot Processing Signs, Posters and Handouts
Boost transparency and understanding with new mail ballot processing area signs, posters and handouts. They’re designed to make it easier for observers, temporary workers and newer staff to follow individual steps and the entire process.
Oct 3, 2024